Like most Mac users I love the “it just works” functionality that OSX brings to the table. Microsoft die-hards hate such statements and will have their own choice words for people that say or write things like that. But I, like a lot of other people, was born and raised on Microsoft OS’ and for years I would look down and spit on the ground every time Apple was mentioned (Paul Simon reference intended). But I have changed. Windows desktop OS, from a personal perspective, is dead to me. I still stay up to date on Windows OS’ but only out of professional necessity. As a wireless networking and security expert I have always been annoyed with the wireless configuration interfaces provided by both Apple and Microsoft. They are, in a word, too simple. But that simplicity is not a shortcoming; it is by design. Daily use desktop OS’ like Windows 7 and Mavericks are designed for everyday (non-technical) users, not for me. And while I would appreciate a lot of additional detail in my interfaces I recognize that they are not necessary to the desired end result: to get connected to the WLAN.
Microsoft offers a good bit of configuration capability and info gathering from the command line. All one needs to do is tap into the power of netsh to see what I mean. Over the years Microsoft has grown into an OS that has a very feature-rich CLI. And for that, I applaud them. Netsh, in particular, is an especially powerful tool. Apple, on the other hand, does not trumpet the command line offerings of its OS. They focus on GUI-driven usability to an enormously diverse group of users who don’t care how WLANs work, only that they work. Connecting to a WLAN should be as simple and as seamless as my mom needs it to be. And to that end, Apple has succeeded (as have Microsoft and most common Linux distros). But command line tools for OSX are there, hiding. OSX is, after all, UNIX-based. One such CLI tool is ‘airport’.
Apple’s built-in CLI tool, Terminal, is not made abundantly visible. I fully expect that this is also by design. OSX is designed to be a graphical OS, using its CLI for daily tasks is not desired. Terminal is nestled in the Applications > Utilities folder and is even more elusive in Launchpad because Apple renamed the “Utilities” Launchpad folder to “Other” a few years back. Yes, you can quickly open it using Spotlight or a third party tool like Alfred.
In older versions of OS X (Snow Leapord and older) Apple referred to its client WLAN internals as airport. They have moved away from this and these days most people associate the word “airport” with Apple’s line of access points and/or with the AirPort Utility that is built-in to OSX (and available for free download on iOS). The AirPort Utility allows you to manage Apple AirPort (and Time Capsule) access points from your Apple devices. And, like pretty much everything Apple does, it is seamless and simple. The ‘airport’ command-line tool, however, doesn’t really have anything to do with AirPort AP’s, it’s an Apple command-line management tool, regardless of the vendor of AP to which you are connected.
Make a symbolic link to the airport utility
The first thing you need to do to start using the airport command is to make a symbolic link to it. For reasons I do not know Apply buried the utility in the /System/Library/PrivateFrameworks/Apple80211.framework/Versions/Current/Resources/ directory. That directory is not in your PATH environment variable so just typing airport from the CLI will fail unless you either A) specify the full path every time or B) navigate to the directory each time. Both options are equally lame so the symbolic link is the best option to make is possible to just type airport. Here is how you create the symbolic link (from a terminal):
sudo ln -s /System/Library/PrivateFrameworks/Apple80211.framework/Versions/Current/Resources/airport /usr/sbin/airportThe two most immediately useful options of the utility are the -I and -s options.
Gathering info about your WLAN connection
Using -I displays information about your current WLAN connection. Lots of good stuff in this output. Check it out:
$ airport -I
     agrCtlRSSI: -40   <------ Current signal strength (dBm)
     agrExtRSSI: 0
    agrCtlNoise: -88  <------ Noise floor (dBm)
    agrExtNoise: 0
          state: running
        op mode: station
     lastTxRate: 450  <------- last data rate from your device
        maxRate: 450  <------- max data rate supported
lastAssocStatus: 0
    802.11 auth: open
      link auth: wpa2-psk  <------- authentication in use
          BSSID: 5c:96:9d:79:4c:25  <------- MAC address of AP
           SSID: AIRPORT   <-------- SSID of AP
            MCS: 23   <-------- MCS value (802.11n, 802.11ac)
        channel: 36,1  <-------- Current channel(s)
The difference between the noise floor (agrCtlNoise) and the current signal strength (agrCtlRSSI) should be 20 at a minimum. In the example above, the difference is 48, which is great. When the difference is greater than 20 (called ‘fade margin’) the signal is usually a stable one. When the fade margin dips below 20 the connection can become unstable and sporadic in its performance.
[message type=”info”]
Stealing a Little CLI Thunder: If you press the Option key and then click on the Airport link you will see all of this info in the graphical interface. Who knew?
[/message]
Scanning for available WLANs
The -s option will scan the frequency ranges supported by your client WLAN adapter and give you a report on what’s out there (as long as it is broadcasting its SSID, that is). The -s option will give you a report that includes the SSID, the BSSID (AP MAC address), received signal strength (RSSI), AP channel(s), High Throughput availability, country code, authentication and encryption (for both unicast and group). Pretty cool. Like most scanning tools, all of this info is extracted from the Beacon frame of nearby APs.
$ airport -s
SSID 		BSSID             RSSI CHANNEL HT CC SECURITY (auth/unicast/group)
STARLORD 	5c:96:9d:69:1c:61 -29  11      Y  US WPA2(PSK/AES/AES)
ATLAS           90:72:40:1c:2c:18 -8   6       Y  US WPA2(PSK/AES/AES)
CHEWBACCA 	00:15:ff:2a:f9:87 -42  1       Y  US WPA2(PSK/AES/AES)
UNKNOWN         90:72:40:1c:bc:29 -30  149,+1  Y  US WPA2(PSK/AES/AES)
LARUE   	5c:96:9d:62:4b:A2 -38  36,+1   Y  US WPA2(PSK/AES/AES)
If you just want the details on a specifc AP (or want to probe from an AP that isn’t broadcasting its SSID you can just add the SSID to the command. Like this:
$ airport -s chewbacca
SSID 		BSSID             RSSI CHANNEL HT CC SECURITY (auth/unicast/group)
CHEWBACCA 	00:15:ff:2a:f9:87 -42  1       Y  US WPA2(PSK/AES/AES)
[message type=”info”]
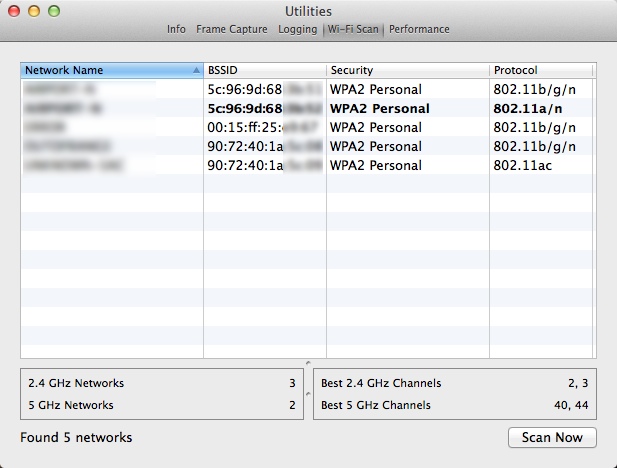
More Theft of Thunder: If you press the Option key and click the WLAN icon you will also see an option called “Open Wireless Diagnostics…”. Click it, enter your password and then ignore the dialog that appears (if you want to). From the Windows drop-down menu, choose Utilities. Select Wi-Fi Scan and then click Scan Now. Note that the other options in this utility are pretty awesome, too.
Note: You can also find Wireless Diagnostics by searching for it with Spotlight. It is actually located in /System/Library/CoreServices/Applications/.
[/message]
Get your (enhanced) output in XML format
If you need your output in XML format, just slap a -x on the command and you’re in business. But what you get in XML format is quite a bit more than you might expect. The -s option by itself constrains itself to pretty limited output (above). The XML output dumps tons of extra data. Check it out for yourself.
Check your WLAN Preferences …then Tweak Them!
The ‘prefs’ verb is used to display and/or set the connection behavior of your WLAN adapter. Pretty cool stuff. If you just want to see what the current setting are:
$ airport prefs
AirPort preferences for en1:
DisconnectOnLogout=NO
Unable to retrieve JoinMode
JoinModeFallback=DoNothing
RememberRecentNetworks=YES    <------- Can be set in GUI
RequireAdminIBSS=NO    <------- Can be set in GUI
RequireAdminNetworkChange=NO    <------- Can be set in GUI
RequireAdminPowerToggle=NO    <------- Can be set in GUI
WoWEnabled=YES
In OS X Mavericks (and Yosemite, I suspect) I am unaware of a place in the GUI to set the DisconnectOnLogout option so it’s a cool feature to have here in the CLI. As recently as OS X Lion it was an option in the GUI interface but Apple has since removed it. I’m guessing that because WLANs have become THE way for apples devices to connect to the network, they saw no need for it. But it appears that they were kind enough to leave the feature in place, if not buried and hidden. It’s a Yes|No option (Boolean). You can set it like this:
$ sudo airport en1 prefs DisconnectOnLogout=Yes
One neat option in the prefs is the ability to tweak how your OS X device will choose from available networks. The default is for the WLANs to be preferred in top-down order in the Advanced section of your network configuration options. Using the GUI interface, you drag the remembered WLAN profiles into an order that illustrates your preferred order of connectivity. The GUI does not provide you with any other option for choosing connection order preference. The airport CLI utility does! The options (for Mavericks, which I am currently running) are:
- Automatic
- Preferred
- Ranked
- Recent
- Strongest
Disconnect from the WLAN (disassociate)
If you want to disconnect from your existing WLAN you can use the -z option (requires root)
$ sudo airport -z
Generate Raw PSKs rather than using a passphrase
Some systems (mostly Linux in my experience) have interfaces that support entering the Pre-Shared Key (PSK) in its ‘raw’ format rather than entering the more traditional passphrase. Most people think the PSK is secret string you type into the password field when connecting to a WLAN. It’s not. That value is called the passphrase, something designed to be more realistically memorable to mortals. The PSK is calculated using the passphrase using a mathematical function called the Password-based Key Derivation Function (PBKDF2). PBKDF2 is math that uses the passphrase and the SSID as variables used to generate a 256-bit PSK. The PSK is then used in some additional exchanges (involving, of course, more math) to create the keys that are used for encrypting data (a topic for another day).
To generate the PSK from the passphrase and the SSID you can do this:
$ airport -P --password=g00df00d --ssid=dojoAP
9e36e6e5bdec927d6da704f4a3df2a959803ca652edfdc056758efd8a26cd3c2
Important note: If you use bangs (!, exclamation points) in your key, you must escape them when entering your key. Enclosing the key in quotes doesn’t seem to work. For example, if your key is g00df00d!! you must escape the two bangs like this:
$ airport -P --password=g00df00d\!\! --ssid=dojoAP
2b8ba2124c5f558f8bee955d363335843cff3ca74cc9c89a30d61b4cf6d16e51
You can validate the functionality of the airport CLI utility using the free PSK generation tool from Wireshark or by using the free PSK generation tool Joris van Rantwijk.
Monitor Mode Captures
The airport CLI utility also supports monitor mode captures, saving a .cap file to the /tmp directory. You will need to tell it which WLAN interface to use and which channel you want to sniff. For example to capture frames using en1 on channel 11:
$ sudo airport en1 sniff 11
Password:
Capturing 802.11 frames on en1.
^C
Session saved to /tmp/airportSniffP2PPCx.cap.
Note that sniffing will disconnect you from any existing WLAN and in my testing I had to manually reconnect after stopping the capture. You can open the capture file using Wireshark or any other tool that understands the capture format.
[message type=”info”]
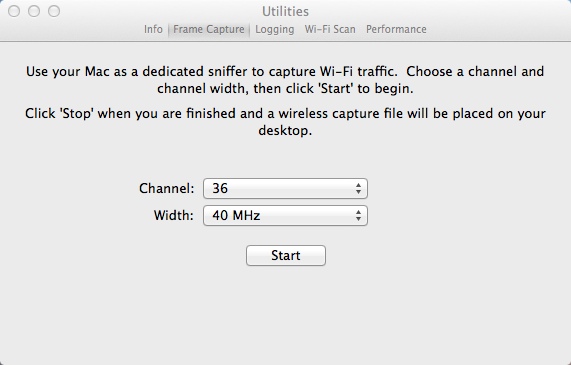
Yet More Theft of CLI Thunder: If you open the Wireless Diagnostics Utility and then open the Utilites options you will also find that you can perform a capture here. Unlike the CLI, the GUI tool saves the file to your desktop.
Cheers,
Colin Weaver
If you liked this post, please consider sharing it.  Thanks!


