Overview
In the 802.11 WLAN security world I frequently refer to pyrit as the ‘unsung hero’. Pyrit is an awesome tool that can do so much but doesn’t tend to get the recognition as more well-known tools like the aircrack-ng suite and coWPAtty. Comparing these different tools can’t really be done in an apples-to-apples fashion but that doesn’t change the fact that pyrit should be on the tips of tongues more frequently than it is when discussing WLAN attacks. Pyrit (and cpyrit) frequently don’t get mentioned until the idea of using GPU’s for attacking WPA-PSK handshakes comes up. Pyrit is so much more than a tool that allows you to make use of the GPU processing capability of your device(s). Even if you aren’t going to use GPU’s for attacking (auditing) WPA-PSK security, pyrit should be at the forefront of your mind. That being said, this article is not about the many uses of pyrit, it is about getting pyrit to work with the Nvidia GPU in your Apple OS X device.
I have used pyrit and GPU’s with Linux, both on local machines and using Amazon EC2 instances, but until recently never gave much thought to using my Mac for the task. Because of Apple’s lack of use as a gaming platform we often do not think of it as a system that will provide high-end GPU performance. The lack of video card modularity combined with limited choice when choosing a graphics card on iMac and MacBook’s is a second reason people tend not to think of their OS X device as a worthy tool for WPA-PSK attacks. But it’s not an entirely fair assumption. While they don’t represent the bleeding edge in GPU performance I have discovered that the GPU processing capability of my Apple devices is worthy enough to let them play, too.
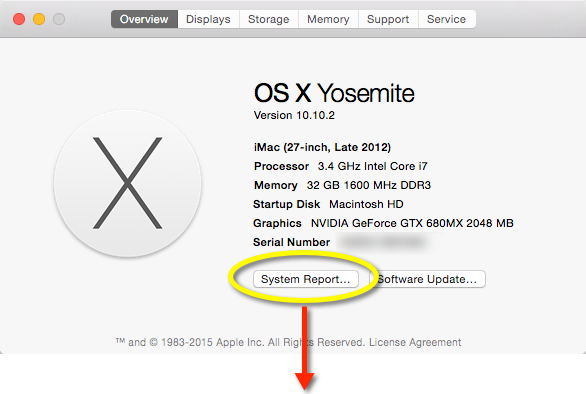
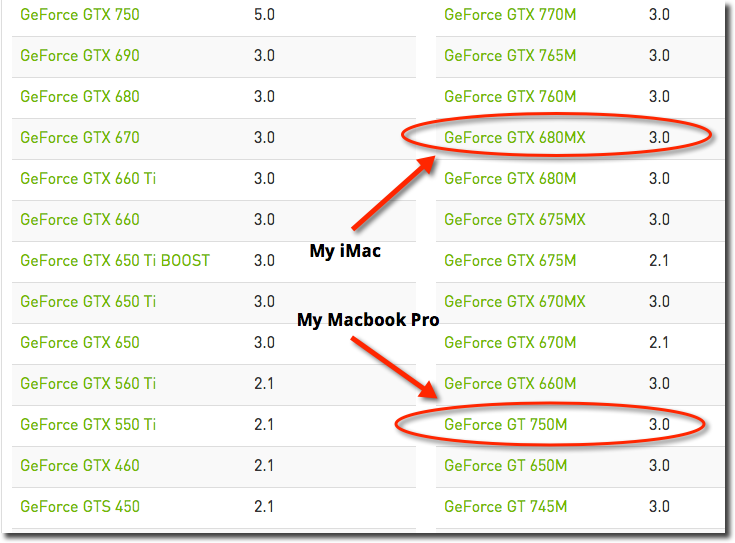
I have a late 2102 iMac with a 3.4GHz i7 processor with 32GB RAM and an upgraded (for its time) Nvidia GeForce GTX 680MX GPU. According to the GeForce web side, this GPU offers 1536 CUDA Cores.
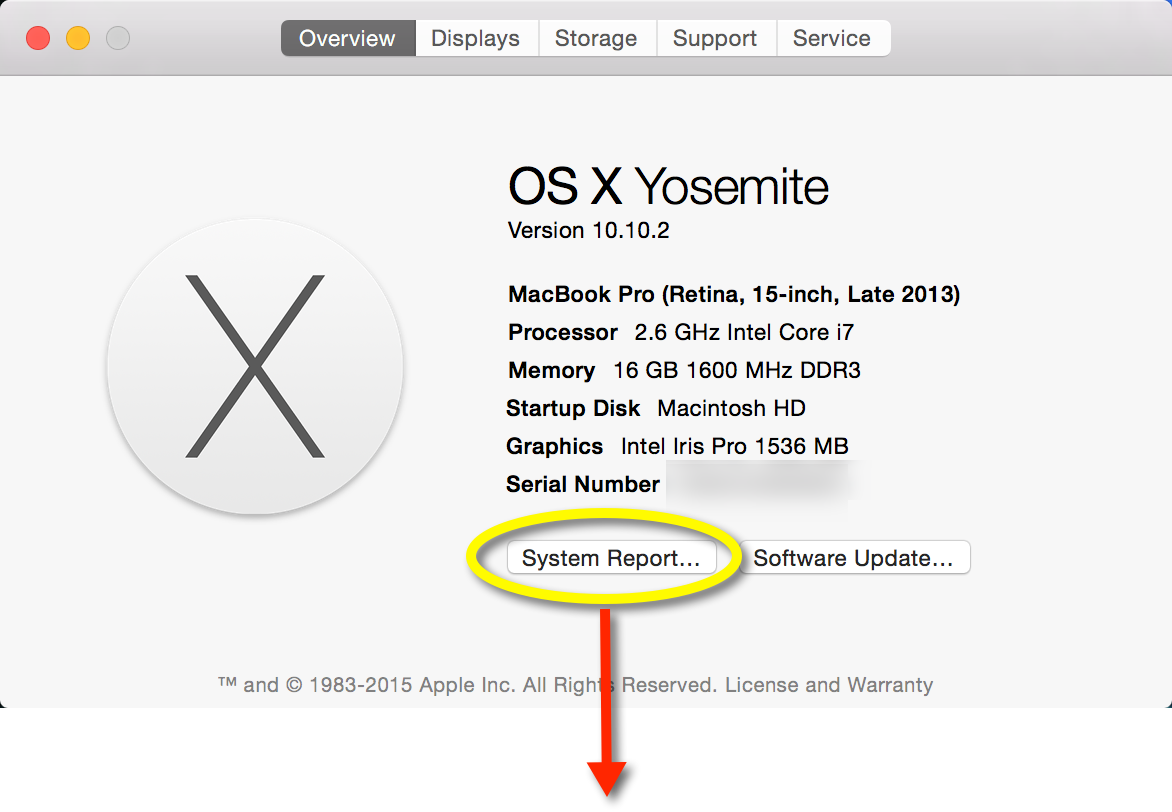
I also have a 15″ late 2013 MacBook Pro with a 2.6GHz i7 processor with 16GB RAM and an upgraded (for its time) Nvidia GeForce GT 750M card. Both of these configs represent the highest level of upgrade possible at their time of purchase. Without any overclocking the performance results I get with these two different systems can safely be considered the upper limit of what you should expect for MacBook Pro’s/iMacs purchased around the same time.
A Few Words on GPU Processing
GPU Processing is a parallel computing platform that allows developers to use the GPU (as opposed to or in addition to the system CPUs) while still writing code in familiar programming languages (C++, C, Python, etc.). The parallel computing part is important. GPUs often have hundreds of cores that can be used in parallel. This contributes to dramatically improved number crunching that cannot be achieved on current CPU architectures. The whole topic is complex, rapidly evolving and packed with a lot of “it depends” types of discussion. Arguing the finer points of GPU vs. CPU architectures is beyond my particular skill set.
According to Nvidia, GPU processing has been around, in its most current form, since about 2006. The modern General Purpose GPU, one that can process high-level language code (like C, C++, & python) continues to evolve and advance at an amazing rate. There are hundreds of millions of GPU devices in the world and, when leveraged, bring a level of processing to the table that is significantly faster than traditional CPU processing. For example, this YouTube CUDACasts video (https://www.youtube.com/watch?v=jKV1m8APttU) demonstrates how some simple python code, which required about 12 seconds to be processed by the the system CPUs can be executed in about 0.13 seconds when using the systems GPU. That’s an amazing difference in time that illustrates the potential to dramatically reduce the time needed to perform calculations on a system.
In the 802.11 WLAN world, calculating the Pairwise Master Key (PMK) is an intense operation, requiring 4,096 separate hashing operations for each passphrase. When doing this for every word in a dictionary file or when doing it for every string generated by crunch, you need to spend a lot of processing time. Using GPUs to help do this takes things to a different level, one that cannot be glimpsed by a system’s CPUs.
Installation
Getting your GPUs to get into the game is not automatic. It requires you to install a lot of supporting pieces of code to make things work. And, unfortunately, it’s not intuitive to most of us. This is true in both the Mac and Linux world (I don’t care about Windows when it comes to using GPUs for what I have in mind). This particular guide is designed to help you get things working on your OS X device.
I have performed these steps on my MacBook Pro and my iMac and both work quite well.
This tutorial breaks the process of installation down into four parts. They are:
- Determining installed video card and verifying video card support
- Downloading the necessary packages, tools and drivers.
- Installing packages, tools and drivers.
- Verifying installation
[divider icon=”bookmark”]
Part 1: Determining installed video card and verifying video card support
[progress_bar value=”25″ icon=”apple” style=”solid” size=”big” bg_color=”530276″]Progress Meter: Step 1 of 4[/progress_bar]
Click on the icon and select About this Mac. Confirm your systems video card by clicking on System Report…
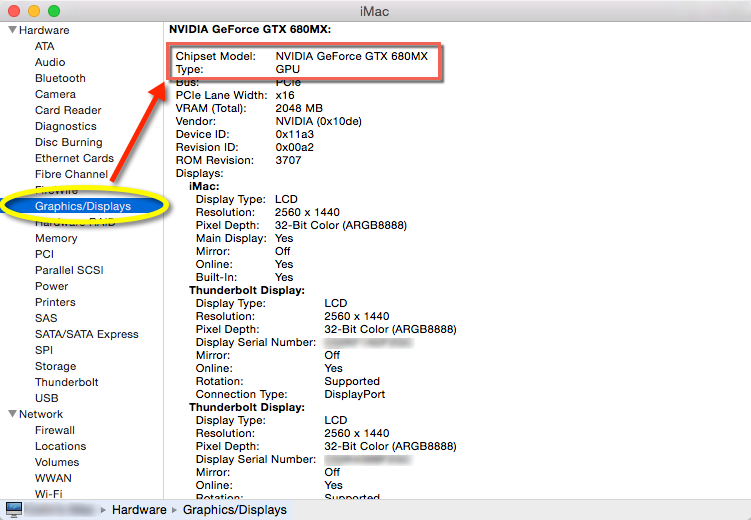
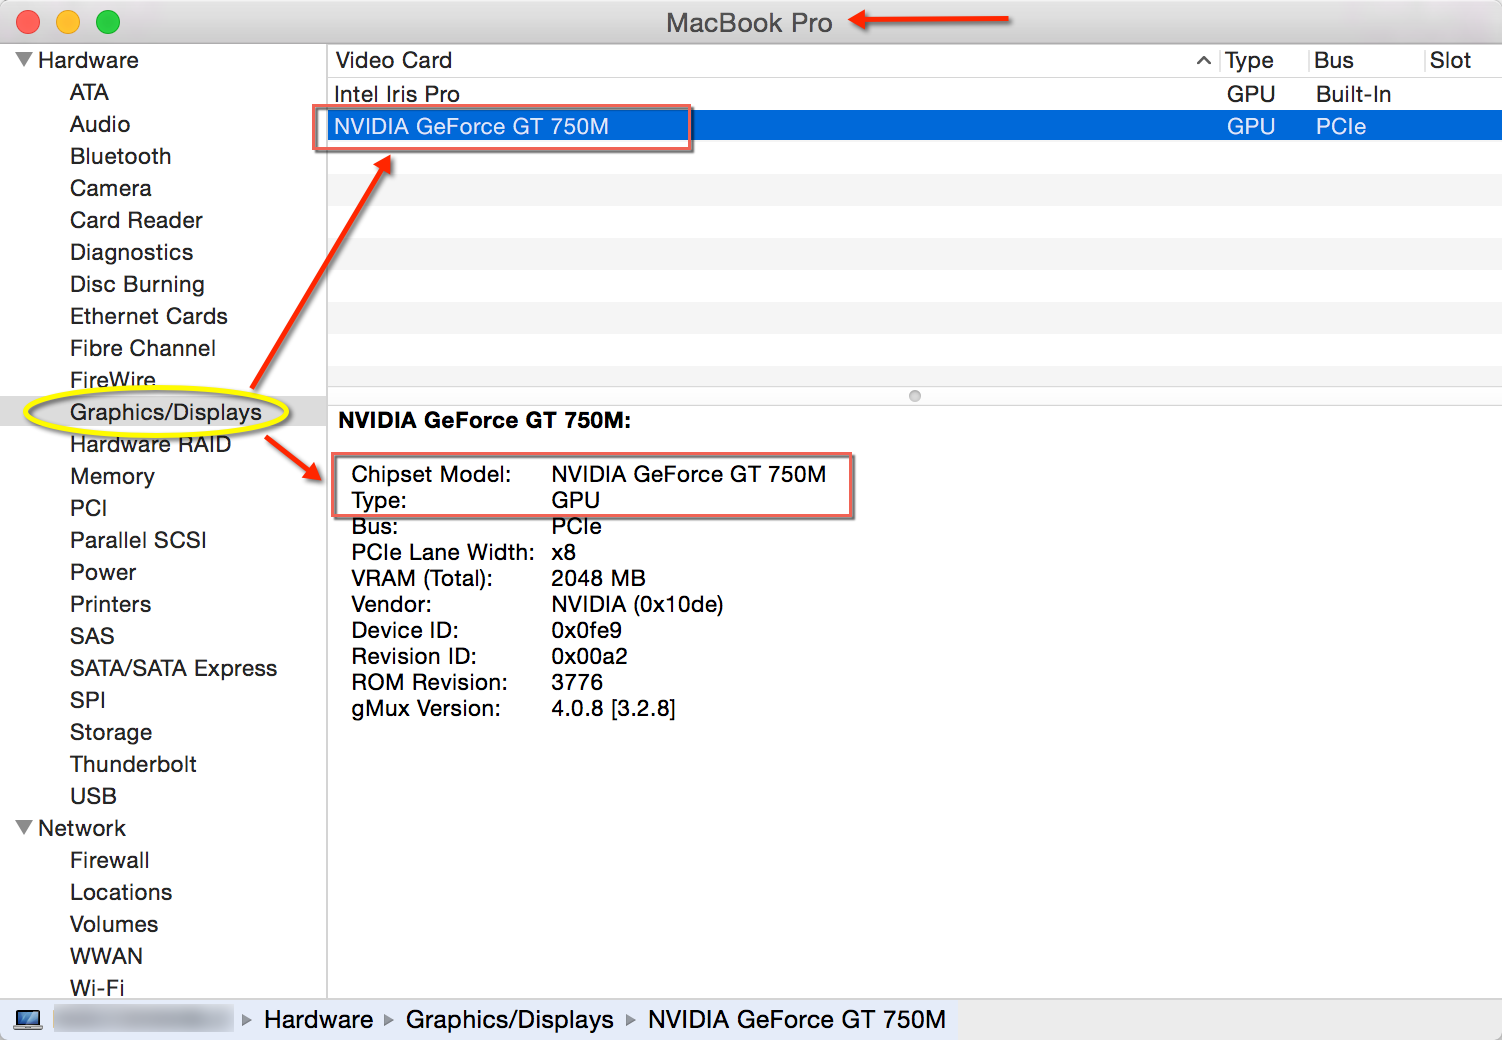
Make note of the Chipset Model value. You will need it in the next step.
Video Card Info on my iMac
Video Card Info on my MacBook Pro
Verifying GPU CUDA Support
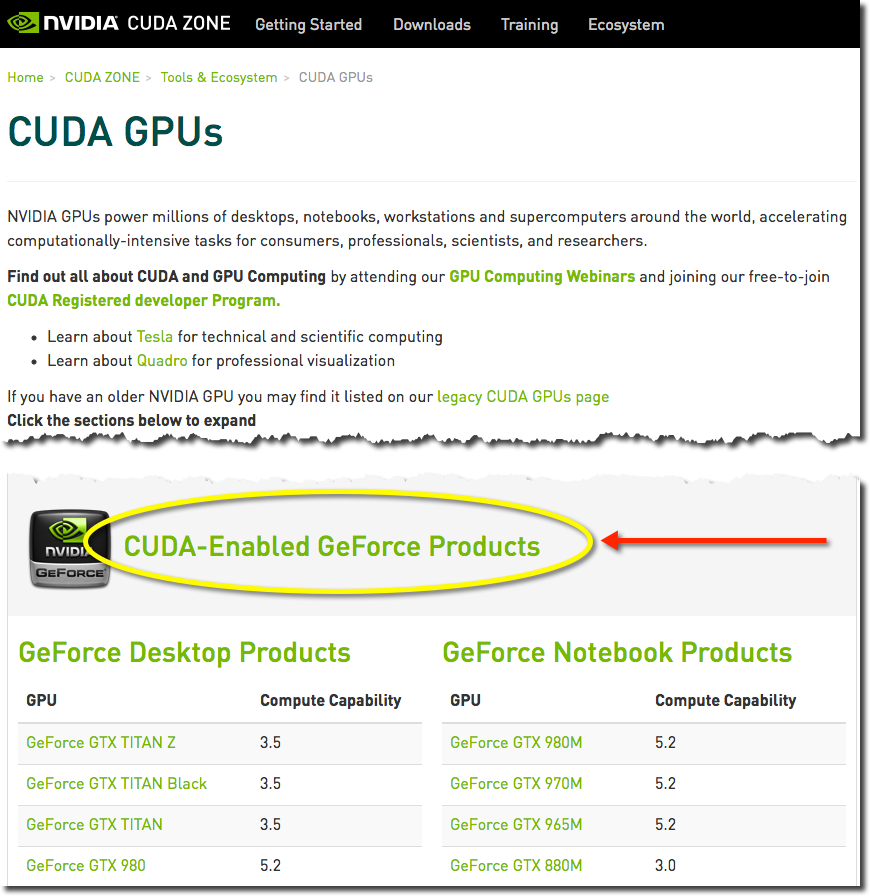
Head over to Nvidia’s website to make sure your video card is supported. As of the time of writing the list of supported GPU’s can be located at https://developer.nvidia.com/cuda-gpus.
Search the list to make sure your video card is listed.
Hint: Press Command + F and search for the Model number of your card (i.e 750M, 680MX, etc.)
[divider icon=”bookmark”]
Part 2: Downloading the necessary packages, tools and drivers
[progress_bar value=”50″ icon=”apple” style=”solid” size=”big” bg_color=”530276″]Progress Meter: Step 2 of 4[/progress_bar]
Note: These steps assume you are downloading everything into the Downloads directory on your system.
Install XCode
Download and install Xcode from the App Store. Search for it in the App Store or go here: https://developer.apple.com/xcode/downloads/
Install XCode Developer Tools
After installing Xcode, open a terminal on your OS X device and install the developer tools (which includes the command-line tools). Please note that this is an important step. Neglecting to install these tools will cause things to fail at the very last moment.
From a terminal:
xcode-select --installDownload the latest CUDA drivers and CUDA Toolkit
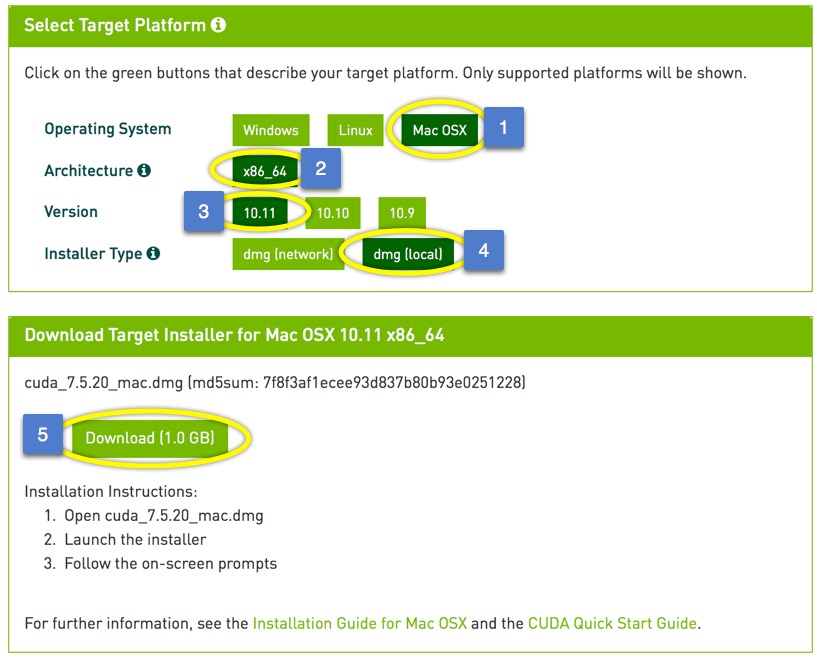
Both are currently contained within a single download on NVIDIA’s CUDA download page (https://developer.nvidia.com/cuda-downloads) website. It’s a big download (~1 GB).
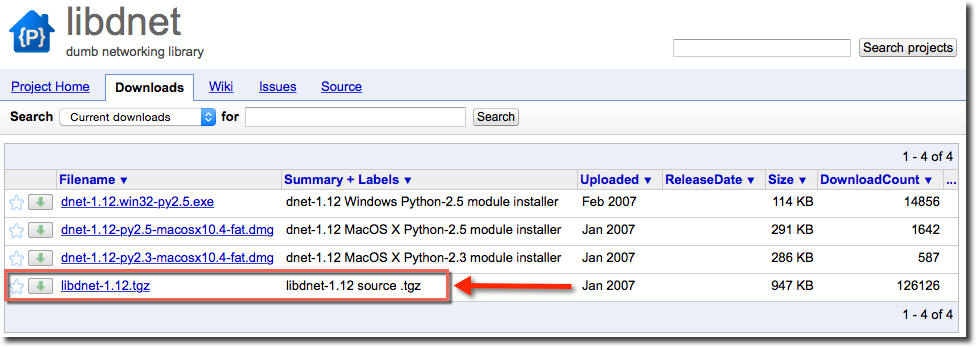
Download libdnet from GoogleCode
You can download the files directly from: https://libdnet.googlecode.com/files/libdnet-1.12.tgz
If interested in reading more about libdnet you can visit the project page at: https://code.google.com/p/libdnet/
Download python-libpcap
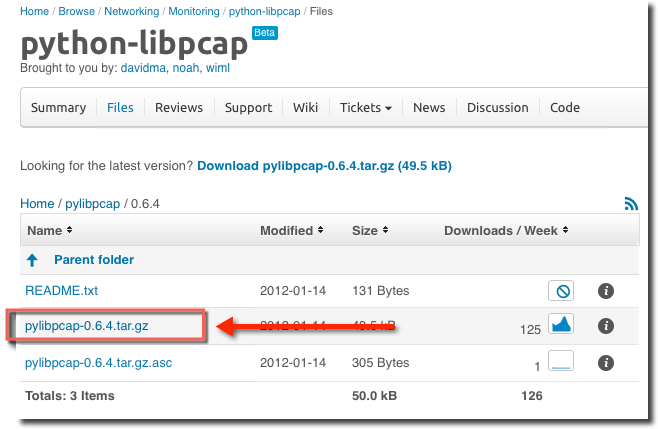
python-libpcap (pylibpcap) is a module for the packet capture library. The main project page can be found here: http://sourceforge.net/projects/pylibpcap/
You can download the files directly from: http://sourceforge.net/projects/pylibpcap/files/pylibpcap/0.6.4/pylibpcap-0.6.4.tar.gz/download
Download scapy
You can directly download the most current version of scapy here: http://www.secdev.org/projects/scapy/files/scapy-latest.tar.gz
Scapy is a crazy-powerful packet manipulation tool (and then some) that allows you to create any type of packet you might want. It is regularly included on lists of who’s who in network security tools.
Verify you have all the tools you need
You should now have all of the packages you will need to install.
[divider icon=”bookmark”]
Part 3: Installing packages, tools and drivers
[progress_bar value=”75″ icon=”apple” style=”solid” size=”big” bg_color=”530276″]Progress Meter: Step 3 of 4[/progress_bar]
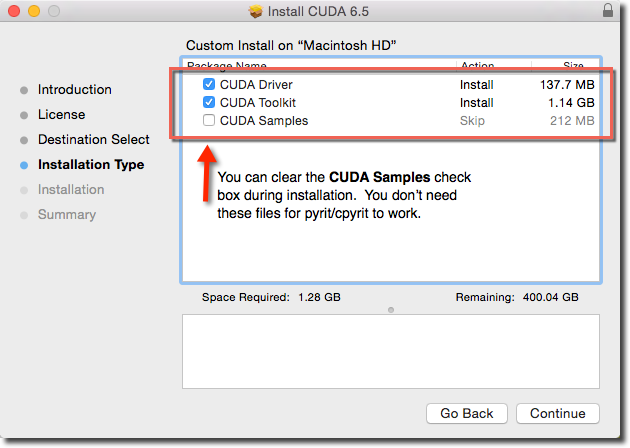
From Finder, double-click the CUDA package to launch the installer. Accept the defaults until you get to the Installation Type section. You do not need the CUDA samples so you can clear that checkbox and save some drive space (unless you want them, of course).
Extract and Install libdnet
From a terminal window:
cd ~/Downloads  (assuming you downloaded all of the files to your Downloads directory)
tar xzf libdnet-1.12.tar
cd libdnet-1.12
./configure
make
sudo make install
cd python
sudo python setup.py build
sudo python setup.py install
Extract and Install python-libpcap
From a terminal window:
cd ~/Downloads
tar xzf pylibpcap-0.6.4.tartar
cd pylibpcap-0.6.4
sudo python setup.py build
sudo python setup.py install
Extract and install scapy
From a terminal window:
cd ~/Downloads
tar xzf scapy-2.1.0.tar
cd scapy-2.1.0
sudo python setup.py build
sudo python setup.py install
Download and Install pyrit
From a terminal window:
cd ~/Downloads
svn checkout http://pyrit.googlecode.com/svn/trunk/ pyrit-read-only
cd pyrit-read-only
cd pyrit
sudo python setup.py build
sudo python setup.py install
At this point, pyrit is installed but cpyrit is not. Before moving on this is a good point to get a baseline to see what pyrit can do just using you CPU (not GPU). To get a baseline, run the following commands from a terminal window:
pyrit list_coresThis command will show you how many CPU’s are available on your system.
pyrit benchmarkThis command will take several seconds to complete. Once completed it will tell you how many PMK’s per second your system CPUs can compute.
- My iMac, with 8 cores, was able to compute about 650 PMK/sec for each core (5,400 PMK/sec for the system).
- My MacBook pro, with 8 cores, was able to computer about 530 PMK/sec for each core (4,240 PM/sec for the system).
Make a note of your system’s CPU PMK generation capabilities and then continue to the next step where support for your GPU will be added.
[box style=”solid” icon=”apple”]
Wanna’ Do a Real Test?
[divider]
If you want to see how long it will take your system to attack a handshake WITHOUT GPU support, follow the next few steps. If you don’t want to do the test, move on to the Install cpyrit section.
Download my WPA-PSK-optimized wordlist. This is a list of about 20 million passwords taken from a variety of Internet-available wordlists. It has been optimized to contain only words that are valid WPA-PSK passphrases. You can download it here:
- WPA-PSK Wordlist File: http://fodder.s3.amazonaws.com/wpa-psk-wordlist.txt.bz2
From a terminal, decompress the wordlist.
bzip2 -d wpa-psk-wordlist.txt.bz2Download a sample capture file that contains a WPA-PSK handshake.
- WPA-PSK Capture File: http://fodder.s3.amazonaws.com/wpa-handshake.pcap
Attack the handshake using pryit
From a terminal (all on one line):
pyrit -r wpa-handshake.pcap -i wpa-psk-wordlist.txt attack_passthroughNote: Without GPU’s this make take a while (many hours). If you want to know how long it takes run the command above with the time command (see below).
time pyrit -r wpa-handshake.pcap -i wpa-psk-wordlist.txt attack_passthroughOnce the attack completes make a note of how long it took. You can compare this to the results you get after enabling GPU support (next).
[/box]
[divider]
Install cpyrit
Last step! This will enable pyrit to use your system’s GPU capabilities.
From a terminal window:
cd ~/Downloads/pyrit-read-only/cpyrit_cuda/

sudo LDFLAGS=-L/usr/local/cuda/lib python setup.py install
[divider icon=”bookmark”]
Part: Verifying installation
[progress_bar value=”100″ icon=”apple” style=”solid” size=”big” bg_color=”530276″]Progress Meter: Step 4 of 4[/progress_bar]
Now that cpyrit is installed run the following commands from a terminal window:
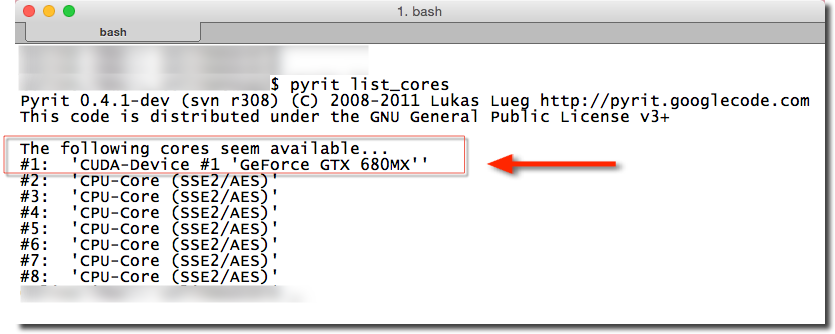
pyrit list_coresYou should now see you GPU device listed. Note that one of your CPU’s is removed. In my system I have 7 CPU cores plus the CUDA device. This is normal. One CPU will be removed for each GPU.
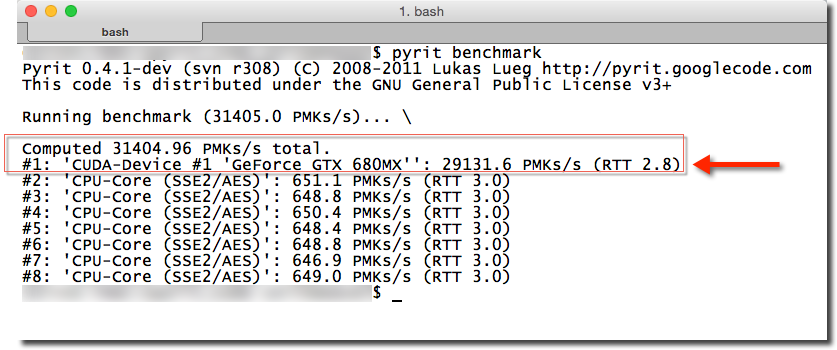
pyrit benchmarkYour GPU should have a dramatically higher PMK rate than your CPU. The total PMK rate is the sum of the GPU and CPU cores.
[box style=”solid” icon=”apple”]
Give It a Real Test!
[divider]
Now that you have GPU support, test your system’s ability to attack a handshake. If you took the time to test your system BEFORE adding GPU support you’ll be able to see just how much better pyrit is with GPU support.
In case you didn’t do the baseline test before, here are the steps again to do a real test:
Download my WPA-PSK-optimized wordlist. This is a list of about 20 million passwords taken from a variety of Internet-available wordlists. It has been optimized to contain only words that are valid WPA-PSK passphrases. You can download it here:
- WPA-PSK Wordlist File: http://fodder.s3.amazonaws.com/wpa-psk-wordlist.txt.bz2
From a terminal, decompress the wordlist.
bzip2 -d wpa-psk-wordlist.txt.bz2Download a sample capture file that contains a WPA-PSK handshake.
- WPA-PSK Capture File: http://fodder.s3.amazonaws.com/wpa-handshake.pcap
Attack the handshake using pryit
From a terminal (all on one line):
pyrit -r wpa-handshake.pcap -i wpa-psk-wordlist.txt attack_passthroughNote: With GPU support this should only take a few minutes. If you want to know how long it takes run the command above with the time command (see below).
time pyrit -r wpa-handshake.pcap -i wpa-psk-wordlist.txt attack_passthrough[/box]
[divider]
That’s it. Enjoy!
Cheers,
Colin Weaver
If you liked this post, please consider sharing it. Thanks!

